Friday, September 14, 2018

Nextcloud, VirtualBox and Shared Folders

Update 10/1/2019 - Getting rc.local to work

I've had trouble getting rc.local to work on VMs with newer versions of ubuntu.  My best efforts are to install samaba, smbclient, run through this, then to actually execute rc.local (running rc.local seems to be critical to get it to run on startup).

Original Post -

This might not be how you're supposed to do it, but it's what worked for me.

Install ubuntu server

Install VirtualBox guest additions

Install Nextcloud

Setup your shared folder of choice in VirtualBox.  I'm not going to talk about doing that, it's pretty straight forward.  I checked automount, though that doesn't seem to help.

I made a directory within /var/snap/nextcloud/common/nextcloud/data/ called share.  You might have to sudo su to do it.

Mount your shared folder to that directory:

  1. sudo mount -t vboxsf share /var/snap/nextcloud/common/nextcloud/data/share/


Auto mounting at startup
  1. Edit /etc/rc.local
    sudo -H nano /etc/rc.local
    
  2. Before exit 0 type:
    mount.vboxsf share /var/snap/nextcloud/common/nextcloud/data/share/ vboxsf
  3. Save and exit, please and thank you.
If you restart your VM, that folder should now be mounted persistently.

If you want to see that folder in Nextcloud, you need to enable External Storage Support in Apps, then in settings, direct the path to the Local share directory you created above, /var/snap/nextcloud/common/nextcloud/data/share/ in my case.

Looks like the Nextcloud community knows that samba doesn't work with the snap installer, however I couldn't successfully install Nextcloud without snap.  It's discussed here, I'm not sure what the downside is to adding shares in your data directory other than accidentally writing files directly to /var/snap/nextcloud/common/nextcloud/data/share/ , instead of to your shared folder.  Maybe a security risk?  I'm not sure.

But I don't really want a huge VM taking up gigs of space, and I'd like to get to the shared files directly, without using the web UI sometimes.  AND I can leave a tiny VM running on my server's boot SSD, rather than having it on a spinning disk, that may or may not be spun up at any given point (would probably even stop it from spinning down).

I got SSL running with my own certs too, based on this.

I used SSL For Free and DNS verification to authenticate the subdomain I'm running this on.

I renamed the files to be: certificate.crt to cert.pem,   ca_bundle.crt to chain.pem, and  privkey.pem to privkey.pem.

I ran sudo nextcloud.enable-https custom -s cert.pem privkey.pem chain.pem and got an error, but it made a directory that I need.

Then I coppied my three files into /var/snap/nextcloud/current/certs/custom/

Than reran sudo nextcloud.enable-https custom -s cert.pem privkey.pem chain.pem

BINGO!!!

This is my next project, except hosted locally:


and
Friday, August 10, 2018

Trek vs Wars

I just had a revelation about why it is less socially acceptable to publicly embrace Star Trek than Star Wars.

Star Wars is for kids. Star Trek is for adults.

Extended adolescence and nostalgia for childhood things is "cool".

Being a grown-up who enjoys and actively chooses to watch a TV show about aliens in space: not so cool.

Monday, July 23, 2018

A Scanner Darkly (2006)

Rotoscope, a process invented by Max Fleischer of animated superman fame. Who's son, Richard Fleischer, was a director for many films including Soylent Green (1973) and Fantastic Voyage (1966). Less notable for Million Dollar Mystery (1987) in which famous stunt man Dar Robinson died, and to whom Lethal Weapon(1987) is dedicated.

I just watched Lethal Weapon and A Scanner Darkly back to back and stumbled upon their connection.

Tasker and Secure Settings

I was having problems when introducing new %Variables passing between Tasker and Secure Settings.

I had to clear the cache on Tasker each time to get it to work. Keep in mind that if you have Tasker set as a device administrator, you'll have to disable Tasker being a device administrator before you can clear the cache. Then reapply administrator privileges.

Saturday, July 21, 2018

More Tasker - Ping an IP

Ever have a server or PC go down that you're counting to have running?

Have Tasker tell you if it's down so you can get it running again.

Here's what you need:

Two android devices, one of which stays home.  I have this running on a tablet at home.
Tasker
Secure Settings
AutoRemoteLite

I'm guessing you already have Tasker running, that's no big deal.  Secure Settings also isn't hard, download and install.  AutoRemote is a bit different though.  It has to be installed on both devices.  Each device will have it's own unique URL and you can add each devices URL to the "devices" list to allow intercommunication.  I pretty much just lucked into it working after messing with it for a while, none of the instructions were too clear on that bit.  Classic tech instructions starting at step 7.

Super Important: In Tasker, go to Preferences > Misc > Enable External Access, or none of this will work.

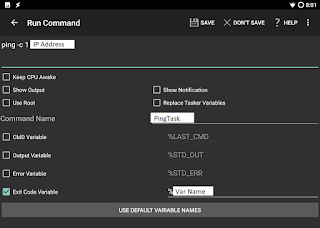
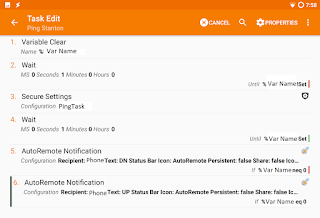
Start a task and set it up like this one.  I'm a little overzealous about clearing variables, probably not necessary.


This is what your AutoRemote setup will look like, chose your own variables.  You can't have mine.  I changed the ping count to 5 to avoid false positives due to WiFi not firing up right away.


I added this to a profile so it pings every 30 minutes between 8:00 am and 10:30 pm.  If my PC goes down, it fires off a notification to my phone.  Pretty nifty.

Next step is to add a counter so if my machine is down I don't get notified continuously if I can't fire it back up for a couple days.

Saturday, June 30, 2018

Scheduled Wake On LAN with Tasker

I've run a bunch of WOL setups, and this one works pretty well.

Ingredients:
  • Android Phone with Tasker
  • WOL app
  • PC that you want to wake up
  • MAC address of said PC
  • IP address of same
I recommend having a static IP address for the computer that you're going to turn on, really the only way to go for this.

Set up your WOL:
In your new WOL app, press the "Add New" button to create a new WOL profile.
Name it something memorable and descriptive, and add the MAC and IP.  Leave everything else the same except for the "Send as Broadcast" check box.  Check that, it's given me the most success.  I recommend testing this bit to make sure you can WOL at all before you start messing with Tasker.

Then, in Tasker, create a new "Send Intent" task.  Here's the details:

  • Action: com.benfinnigan.wol.widgetlaunch
  • Cat: Launcher
  • Extra: CPATH: /mnt/sdcard/WoLANWAN/YourWOLProfileNameHere.dat
  • Target: Activity

Now you can add the task to whatever trigger you want, or just run it on demand.

Glad I've written this down now.  I had to resurrect my poor boot-looping Nexus 5 to get retrieve this info.


Saturday, June 23, 2018

Mission Impossible: Replace existing router with Ubiquiti USG

I've been a home router hobbyist for a while now.  Probably goes back to my college days where I was pretty sure I was going to get a Cisco certification.  Careers took me a different direction.

I've run stock, tomato, wrt, pfsense, edge, and now I'm giving a USG a shot.

That USG sure wants to be set up fresh on a new network.  If you're like me, you already have a lot of in place gear and your own subnet setup that you don't want to mess with.  I was able to replace my existing non-Ubiquiti router without having to detach anything other than the router.

I have some Ubiquiti gear on my network, so I was already running the controller software on a desktop PC.  I'll tell you what, that USG sure didn't want to adopt.  This is what I did and it ended up being easy, just took a while to figure out.  In the end, I was as able to adopt all the hardware and not lose my existing Ubiquiti controller setup.

Materials:

  • Desktop running existing controller
  • Laptop running a fresh install of the controller software for windows (or your OS of choice)
  • USG
  • Network cable

I recommend updating the controller software to the latest version so you're running the save version on both computers.  The second computer doesn't have to be a laptop, but it makes it easier to keep track of the computers for descriptive purposes.


  1. Don't take any gear apart yet, you're going to want internet for the following steps
  2. Make a backup of the existing controller software on the desktop.  That can be found in Settings > Maintenance.
  3. Copy that backup to the laptop
  4. Turn off wireless on the laptop and disconnect all other network cables to the laptop
  5. Restore the controller backup to the laptop (you might have to do some initial config beforehand)
  6. Connect the laptop with the network cable to the LAN1 port on the USG
  7. Setup the Settings > Networks so that it mirrors your existing network's DHCP config
  8. Adopt the USG on the laptop
  9. Backup the laptop controller config, name the file accordingly
  10. Disconnect the laptop from the USG and put it back on the existing net
  11. Transfer the new backup to the desktop and restore it
  12. Swap out your old router for the USG
  13. Give everything a restart for good measure


I was getting hung up on the fact that the USG REALLY wants to be 192.168.1.1.  You can't adopt a ubiquiti component that is on a different subnet.  By hooking up the laptop, it uses the USG's DHCP and the USG can be adopted.

This worked for me and I'm enjoying the USG so far.