Monday, December 5, 2011

Apps to SD

Another good tip, to allow more apps to be moved to the SD card.

The instructions weren't super clear because "adb.exe" is part of SuperOneClick, as far as I can tell.

Using the command "adb devices" then "adb shell pm setInstallLocation 2" worked for me. We'll see if stability is affected.

If it doesn't work, I can always change it back with "adb shell pm setInstallLocation 0"
Saturday, December 3, 2011

Root and Flash Optimus V

Here's some good resources for rooting and then flashing an Optimus V.

I didn't find any good start to finish guides that didn't include a step like: "now flash the OS and you're done!" when I had no idea how to do that.

Here's just a handy starter, rooting "unlocks" your phone so you are essentially a superuser and can make big changes that you couldn't otherwise. Flashing the OS is what can make the big difference in the useability of your phone.

I used GingerBreak 1.2 to root, but my boot loader screen didn't give me all the options I needed (update, backup, etc.). So then I used Super One Click to essentially re-root using the command prompt.

Flashing was super easy. Move the .zip file that has your ROM (phone OS) to your SD card, then enter the boot loader menu (hold the home key + volume down + power when powering up) and choose "update from zip".

GingerBreak: http://forum.xda-developers.com/showthread.php?t=1044765
Root and flash: http://forum.xda-developers.com/showthread.php?t=935312
Bumblebee Rom: http://forums.androidcentral.com/optimus-v-rooting-roms-hacks/78705-rom-kernel-bumblebee-2-4-6-25-2011-a.html
How to flash the OS: http://www.thedroiddemos.com/2010/11/07/how-to-flash-a-custom-rom-on-android/

Monday, November 14, 2011

Windows Media Center

I haven't officially said it online, but I'm done with MediaPortal.

Windows Media Center in Windows 7 works so much better.

It's more stable, automatically downloads the program guide (for the correct time zone and time change), can be accessed on my android phone remotely, doesn't quit if disconnected from the network, wakes from sleep to record, has a better interface, and is just generally great overall.

Plus it has a great build in photo screensaver.

I've spent countless hours (days, weeks) tweaking, repairing, fixing, enhancing, un-enhancing...

My HTPC isn't a hobby anymore, I don't have to mess with it.

Sunday, January 2, 2011

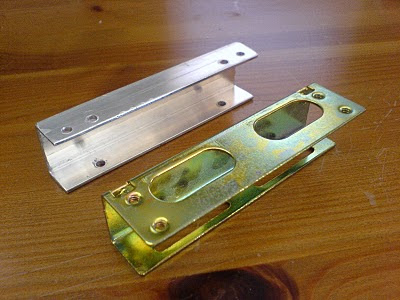
DIY 3.5" to 5.25" Hard Drive Adapter


Hard drive adapter brackets are so expensive, I decided to make some myself. I now have a dozen adapters for the price of one pair on newegg.

These are made out of 3/4" aluminum channel. Available from ye olde neighborhood big box hardware shoppe. Trim to 3-5/8" long.

The threaded holes that attach to the case are 1/8". They could probably be smaller if you have a tap & die set to thread the holes.

The pass through holes for the hard drive are 3/16".

The mounting pattern is:

3-1/16" on center for the case side of the bracket
2-5/16" on center for the hard drive side of the bracket.

These measurements may be more exact in metric, but the longest metric measuring device I have is a SwissCard.

Tip A: It's handy to have a drill press.
Tip B: I drilled the hard drive side holes through both sides so a screwdriver can be inserted all the way through for easy mounting.
Sub Tip B: Drill the important side first, then allow the bit to go through the less critical side.